Disclosure of Material Connection: Some of the links in the post above are "affiliate links." This means if you click on the link and purchase the item, I will receive an affiliate commission. Regardless, I only recommend products or services I use personally and believe will add value to my readers. I am disclosing this in accordance with the Federal Trade Commission's 16 CFR, Part 255. This site is a participant in the Amazon Services LLC Associates Program, an affiliate advertising program designed to provide a means for sites to earn advertising fees by advertising and linking to Amazon.com
Having a microwave in your kitchen provides tons of convenience! From heating up your morning coffee to popping some popcorn for an afternoon snack, we use our microwaves on a regular basis. And all that use means grease and grime can quickly build up inside your favorite appliance. Luckily, there are a few great ways to clean your microwave quickly and easily. And none of them involve the use of harsh commercial cleaners! These natural ways to clean your microwave are the best ways to tackle the grime without store-bought cleaners.
See also: These are the best ways to finally get your pans cleaned spotless!
The Best Natural Ways to Clean Your Microwave
If you can’t quite get to it yet, be sure to pin these tips for later use! If you’re tired of using harsh and smelly chemicals where your food is prepared, you’re not alone! More and more people are looking for a natural clean to take care of the grime on their microwaves in particular. Use these helpful tips, with simple everyday ingredients the next time you tackle the kitchen!
Vinegar

My favorite natural way to clean your microwave is with vinegar. This amazing cleaning ingredient not only helps loosen the stuck-on food and grime from your microwave, but it also helps naturally disinfect the appliance as it cleans. To clean your microwave with vinegar, fill a microwave-safe bowl or cup with two cups of white vinegar.
Microwave the cup on high for around five minutes, giving the vinegar plenty of time to come to a boil and release steam throughout the microwave as it cooks. The steam from the vinegar will help loosen the stuck-on dirt and food from the microwave walls and top.
When the cook time is up, carefully remove the cup from the microwave. Be sure to use a towel or pot holder to when removing the cup because it will be very hot! Pour the vinegar down the drain and set the cup aside. Then, wet a cleaning cloth or sponge and wipe down the walls, top, and bottom of the microwave, rinsing between wipes. Continue wiping until all the stuck-on grime has been removed.
Water

If you don’t have vinegar on hand, water is a great alternative. There are two methods to cleaning your microwave with water:
- Fill a microwave safe cup with water, similar to the method for cleaning with vinegar
- Soak a handful of paper towels with water and place them inside the microwave
Run the microwave for up to five minutes, allowing the water to create steam to clean the gunk from the microwave walls. Finish by wiping the walls, top, and bottom of the microwave to clean away all the residue.
Baking Soda

If your microwave still has stubborn stuck-on food inside, it may be time for a different approach. Instead of using harsh chemicals or abrasive scrubbers to remove that stuck-on food, grab a little bit of baking soda. In a small bowl, combine two parts baking soda with one part water and mix until a thick paste forms. Rub the paste over the stuck-on food using a paper towel or cleaning cloth.
Allow the mixture to rest on the mess for at least five minutes. Use a clean, damp cloth or sponge to wipe away the baking soda, along with the stuck-on food. If the food is still stuck, rub a small amount of baking soda over the area to scrub away the remaining bits of residue from the microwave. Finish by wiping down the microwave with a clean, damp cloth to remove all the baking soda residue from the inside of the appliance.
Lemon

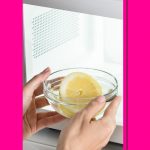
If you can’t stand the smell of vinegar but still want a natural cleaner with power, try a lemon instead. Slice a lemon in half and squeeze the lemon juice in to a microwave safe cup or bowl. Add the lemon rinds to the bowl and fill it with water.
Place the cup or bowl in the microwave and cook on high for at least three minutes – enough time to cause the water to come to a boil. Let the bowl stand in the microwave for another five to 10 minutes to give the steam time to loosen all the stuck-on food.
Carefully remove the bowl from the microwave, then use a clean, damp cloth to wipe the inside of the appliance. Start at the top of the microwave and work your way to the bottom, wiping crumbs and food away as you clean. To clean stubborn messes, dip the cleaning cloth or sponge into the warm lemon water and scrub until the food is removed.
Baking Soda and Vinegar

For a microwave that is extremely messy, you may need to use a combination of these two powerful natural cleaners. Start by mixing baking soda with warm water to create a cleaning solution, stirring the baking soda into the water until well mixed. Wipe the inside of the microwave with the baking soda solution to coat all sides of the microwave.
Then, place a cup of equal parts vinegar and water inside the appliance and run for three to five minutes to create steam. Leave the microwave door closed for around 10 minutes to allow the steam to thoroughly saturate the microwave. Dip a cleaning cloth in the vinegar and water solution and wipe down the inside of the microwave to clean all the stuck-on gunk away.
Thanks for checking out these simple cleaning tips for your microwave! If you’re on to the bathroom next, here’s a terrific guide to deep cleaning your bathroom in under an hour! What’s your favorite method for removing gunk from kitchen appliances? If these were the least bit helpful consider sharing so your friends can enjoy a chemical free clean next time around!